

Article 010 - Home Assistant: House Energy, Solar, Battery & Workshop Control & Monitoring
- Details
- Published: Friday, 16 October 2026
- Hits: 163
Home Assistant: House Energy, Solar, Battery & Workshop Control & Monitoring
- Introduction
- The Hardware
- Sharing the Inverter with SolisCloud
- How My Config Is Organised
- Reading the Meter and Sensors over Modbus
- Calculating House Consumption
- Battery Charging from the Solar Forecast
- Workshop Aircon Control
- Battery Room Safety Alarms
- Uploading to PVOutput
- The Dashboard
- The Other Dashboard Tabs
- Final Thoughts
This is my own setup and it's experimental. If you decide to build something similar, you're on your own. I can't be held responsible for any problems, issues, damage or injury that may occur if you follow it.
1. Introduction
In Article 001 I described the VB.NET app I used to monitor my Solis battery inverter through the SolisCloud API, and to set the overnight charging times from a weather forecast. In 2024 I retired that app and moved everything over to Home Assistant.
The big change is that Home Assistant now talks to the battery inverter directly over Modbus, on my own network, rather than going via the cloud (with its 5-minute delay!). The same goes for my electricity meter, the Battery Room sensors and the workshop aircon. Everything is local, fast and doesn't depend on someone else's server.
This article walks through how it all fits together: the hardware, the Modbus box that lets Home Assistant and SolisCloud share the inverter, the automations that set the battery charging from the solar forecast, my custom workshop aircon controller, the safety alarms and the dashboard you can see above.
It's been running non-stop since 2024 with no reliability issues & no downtime at all.
- Live grid import/export, solar generation, house consumption and battery state on one dashboard.
- Sets tomorrow's overnight battery charging window from the solar forecast, automatically, at 00:30.
- Tops the battery up in the afternoon if it's running low on the cheap rate.
- Controls the workshop aircon from its own temperature sensor, with cool, fan and heat setpoints.
- Emails me if the Battery Room gets too hot or detects smoke.
- Uploads solar and consumption data to PVOutput every 5 minutes.
2. The Hardware
| Item | Device | How Home Assistant talks to it |
|---|---|---|
| Solar inverter | Bosch BPT-S4 | Custom bosch integration (solar power) |
| Battery inverter | Solis RAI-3K-48ES-5G | Solis Modbus integration, through my Modbus box (see section 3) |
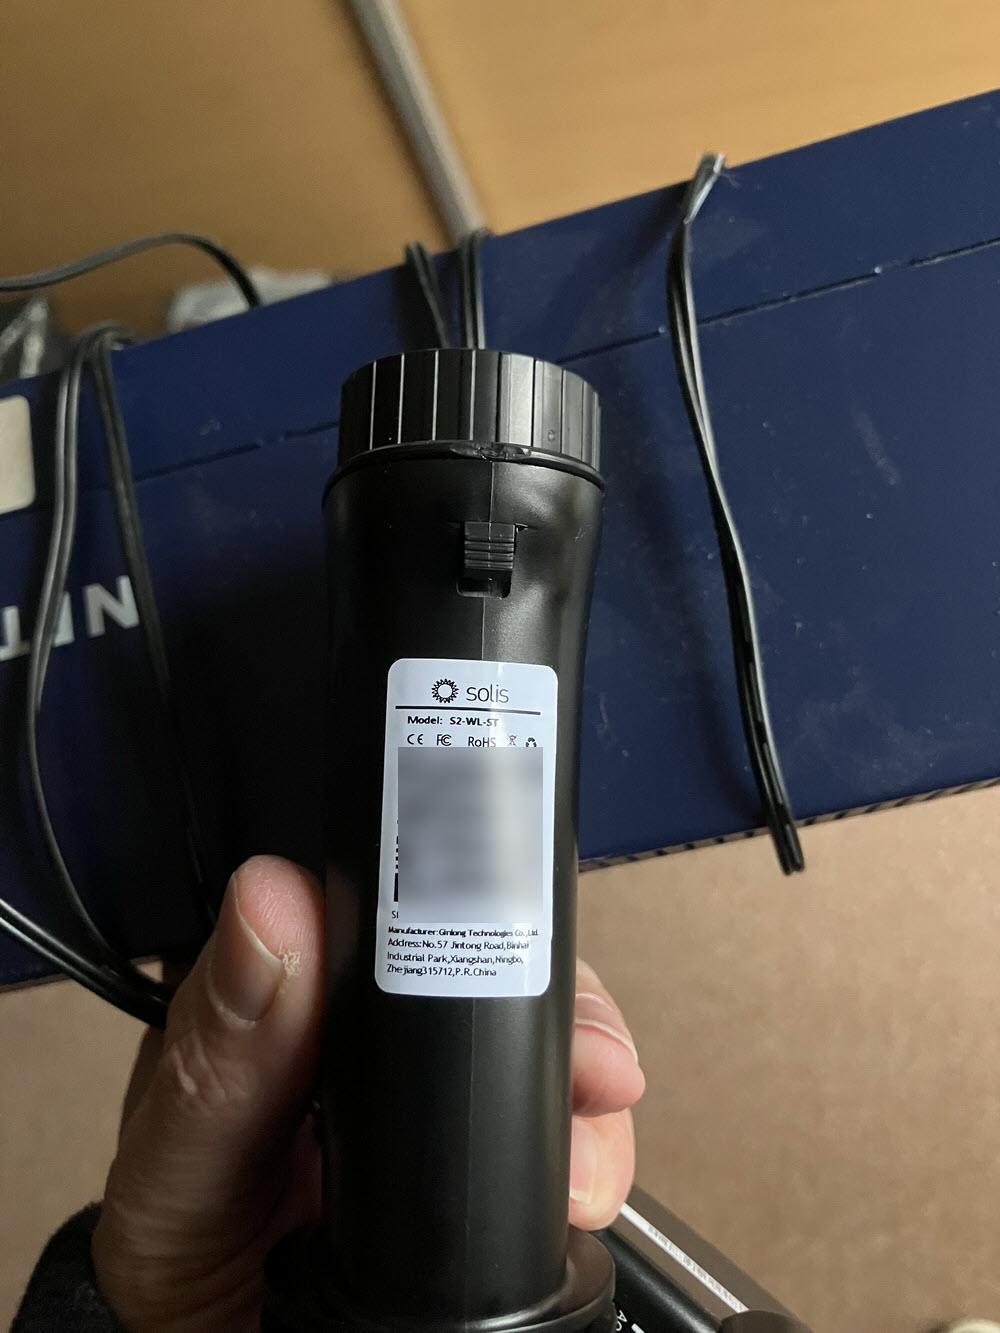
| Inverter Wi-Fi stick | Solis S2-WL-ST | Reports to SolisCloud, also through the Modbus box |
| Batteries | 10.65 kWh lithium iron phosphate (LiFePO4) | Via the Solis inverter |
| Electricity meter | OB418 energy meter | Modbus, via a Waveshare RS485-to-Ethernet adaptor |
| Battery Room temperature | XY-MD02 sensor | Modbus, via a Waveshare adaptor |
| Battery Room smoke | Sonbest SM7571B sensor | Modbus, via a Waveshare adaptor |
| Workshop temperature | Dogratian USB temperature/humidity sensor | Custom dogratian component on a USB serial port |
| Workshop aircon | Daikin FTXP-L / RXP-L | Daikin integration, plus direct commands to its local Wi-Fi API |
The solar forecast comes from the free Open-Meteo Solar Forecast integration, installed through HACS.
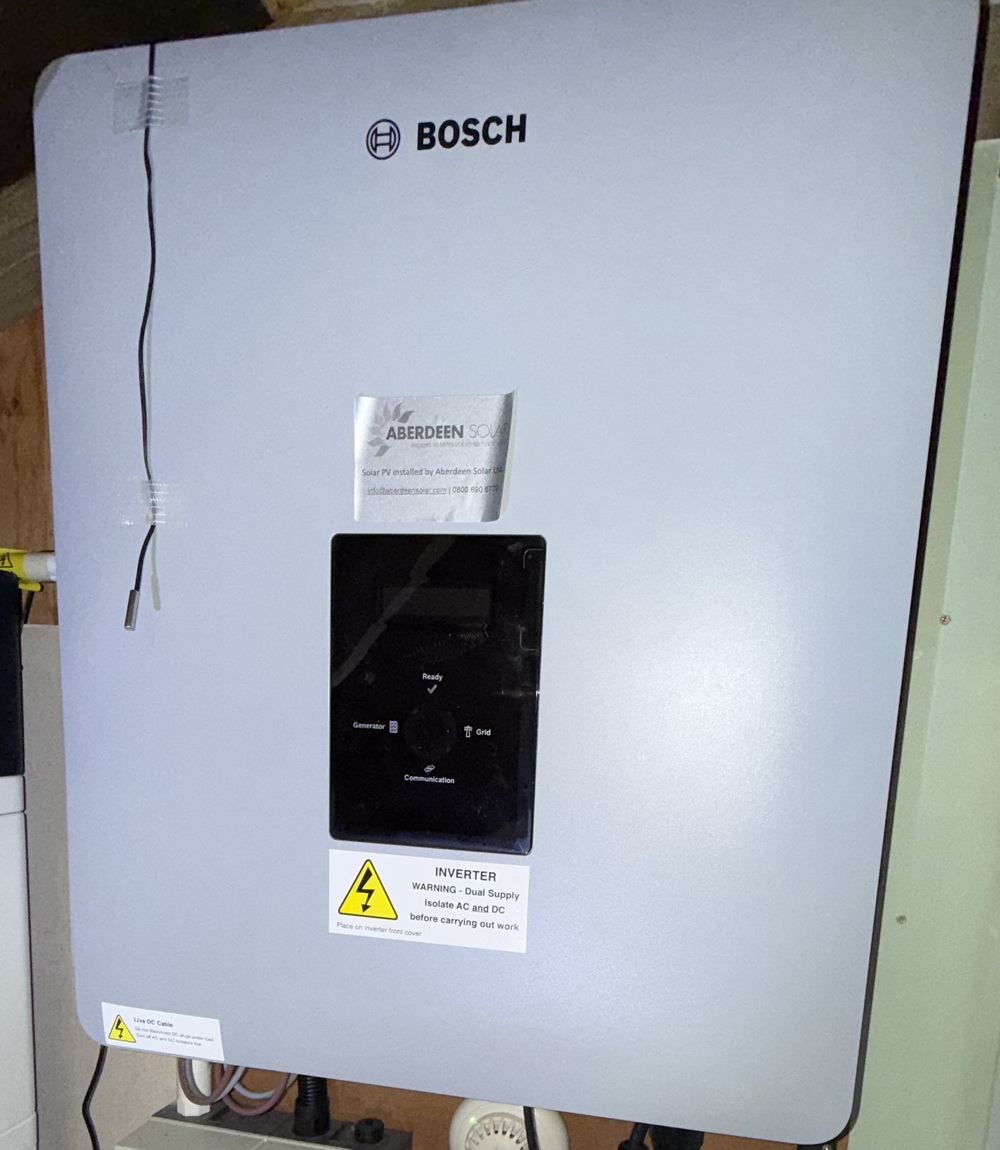
The Bosch BPT-S4 solar inverter:
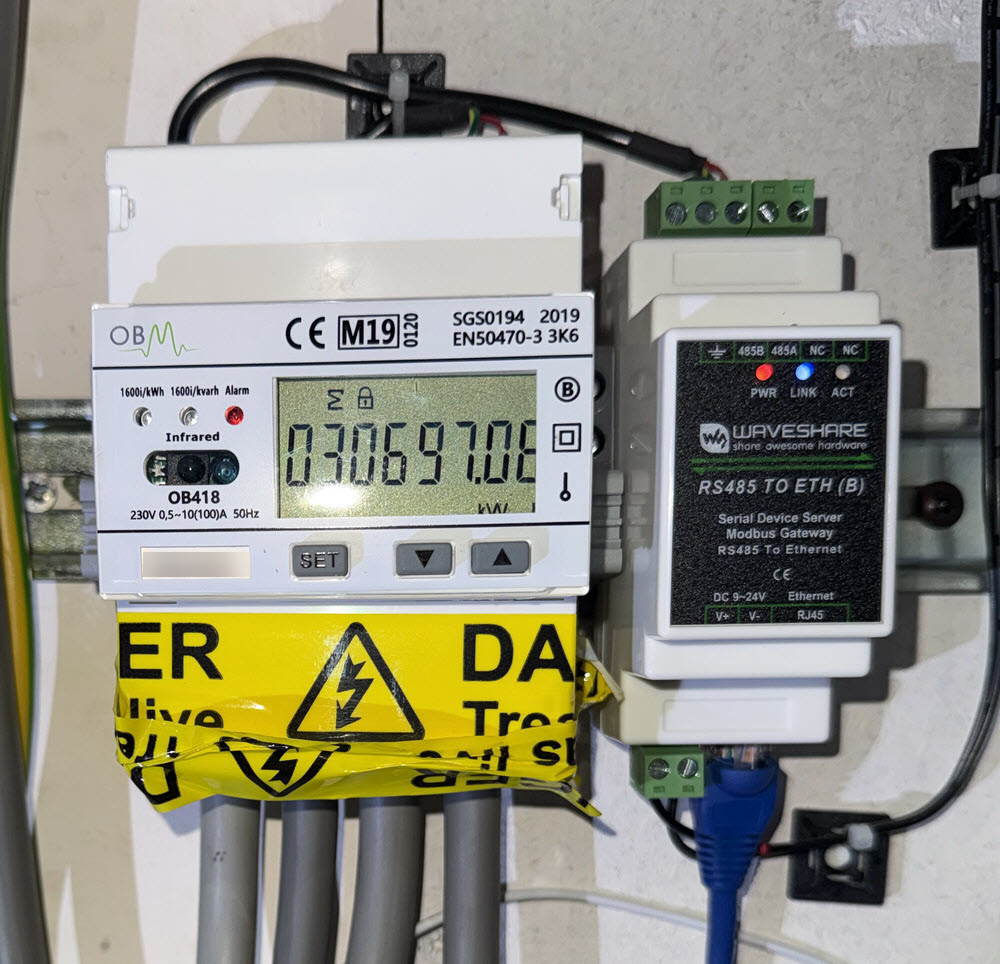
The OB418 energy meter, with its Waveshare RS485-to-Ethernet adaptor alongside on the DIN rail:
Network addresses
Every device has a fixed address on my LAN, reserved in pfSense, so Home Assistant always knows where to find it. None of them has internet access, and there's no port forwarding, so they can't be reached from the internet. The only exception is the Solis Wi-Fi stick, which keeps its own secure two-way connection to SolisCloud. SolisCloud offers good monitoring and reporting functionality:
| Device | IP address | Used for |
|---|---|---|
| Waveshare – OB418 meter | 192.168.1.200 |
Modbus TCP, port 4196 |
| Waveshare – Battery Room temperature | 192.168.1.201 |
Modbus TCP, port 4196 (XY-MD02) |
| Waveshare – Battery Room smoke | 192.168.1.202 |
Modbus TCP, port 4196 (SM7571B) |
| Daikin aircon | 192.168.1.203 |
Local Wi-Fi, read via undocumented API |
| Bosch BPT-S4 solar inverter | 192.168.1.204 |
Local web interface (HTTP), read via undocumented API |
| Waveshare Modbus Box "INV" | 192.168.1.212 |
Solis Modbus integration (inverter COM port) |
| Waveshare Modbus Box "STICK" | 192.168.1.213 |
Relays the Wi-Fi stick's traffic to the inverter |
| Solis S2-WL-ST Wi-Fi stick | 192.168.1.193 |
Reports to SolisCloud via it's own secure link |
3. Sharing the Inverter Between Home Assistant and SolisCloud
The Solis inverter has a single green COM port on its underside, normally used by the Solis Wi-Fi stick. Out of the box, whatever is plugged into that port is the only thing that can talk to the inverter. Plug in the Wi-Fi stick and you get SolisCloud but no local Modbus access. Plug in a Modbus adaptor instead and you lose SolisCloud.
I wanted both: Home Assistant reading and writing the inverter's registers directly, and the inverter still reporting to my account at www.soliscloud.com. So I built a small box with two Waveshare RS485 TO ETH (B) Modbus gateways.
I needed the Waveshares because, although the Wi-Fi stick is a Modbus (RS485) device, its firmware won't share the bus with any other device!
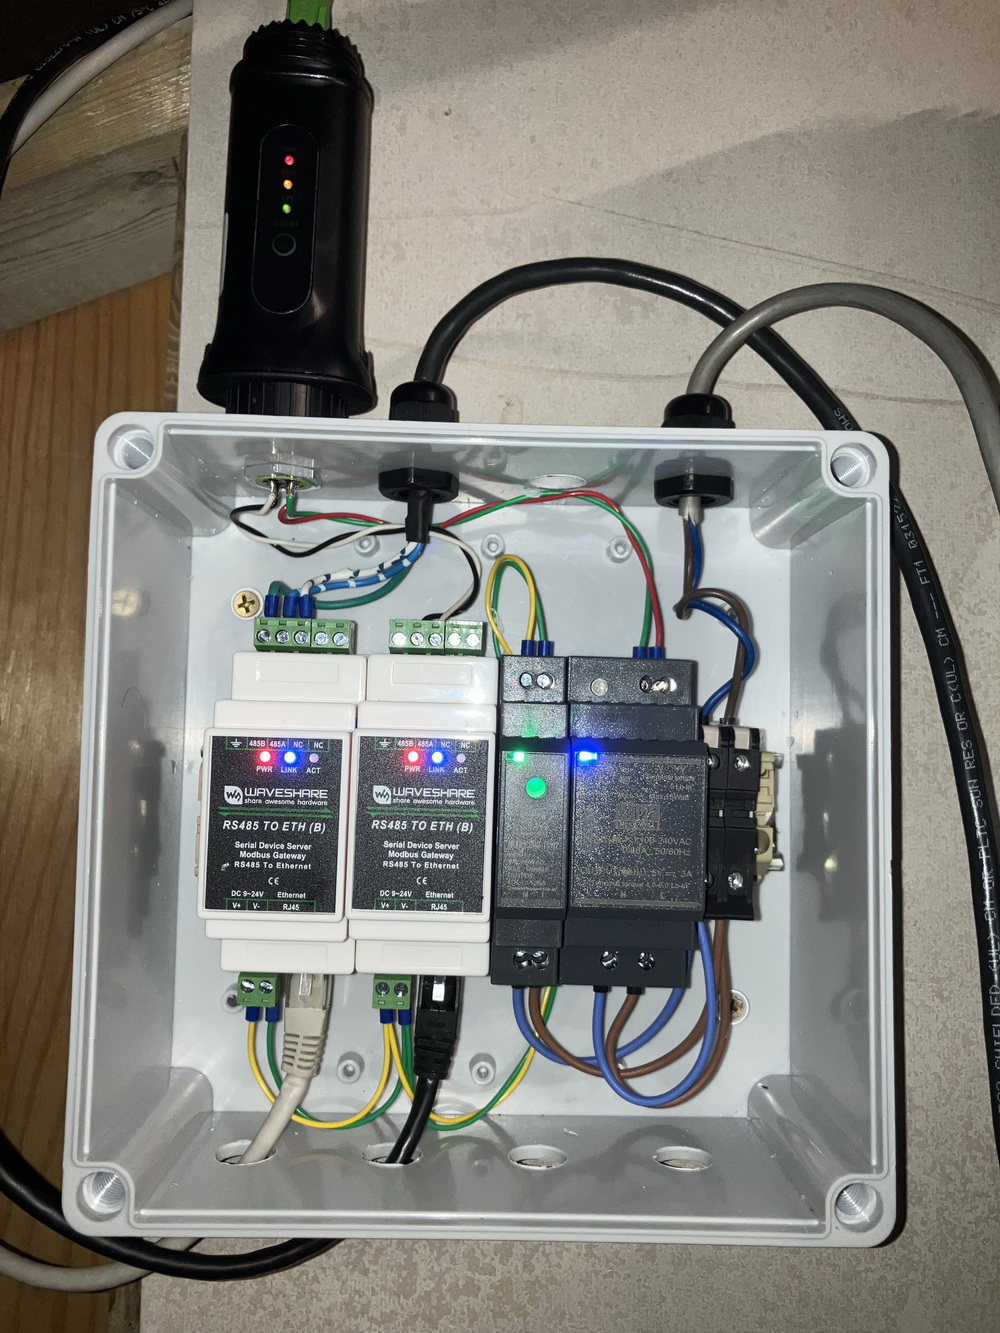
Inside the box: two Waveshare RS485-to-Ethernet gateways, two DIN-rail power supplies and two 1 A fused terminals:
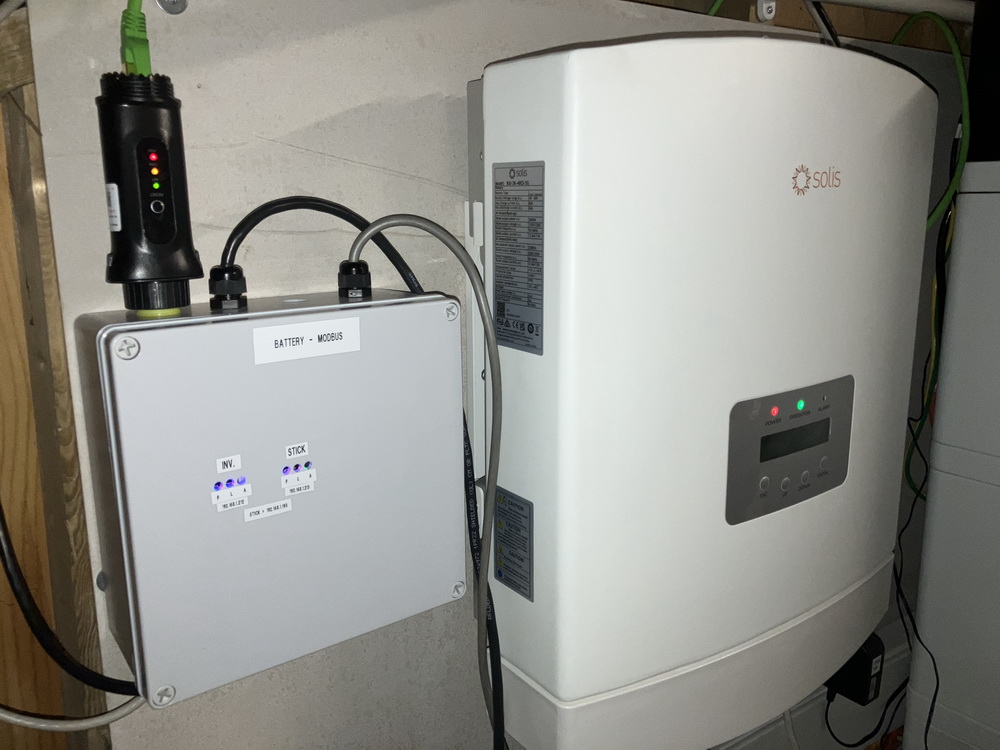
The Modbus box next to the Solis inverter, with the Wi-Fi stick plugged into the top of the box:
| Part | Job |
|---|---|
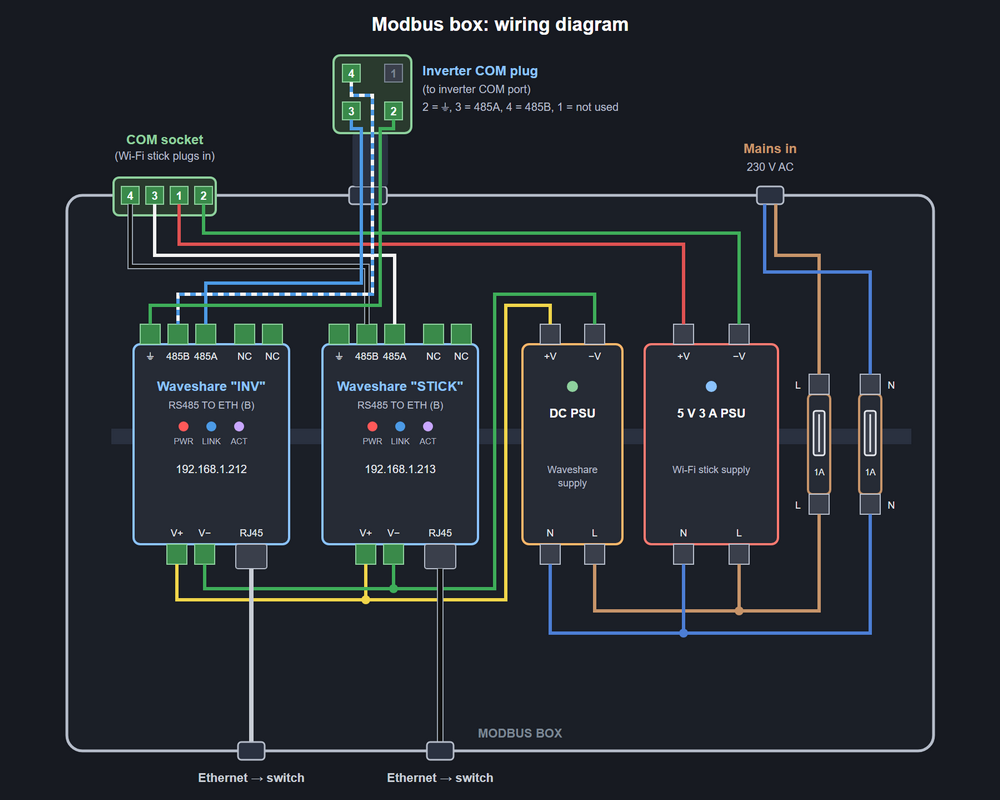
| Waveshare RS485 to ETH (B) "INV" | Wired to the inverter's COM port. Home Assistant's Solis Modbus integration connects to this one. |
| Waveshare RS485 to ETH (B) "STICK" | Wired to a Solis-style COM socket on top of the box, where the Wi-Fi stick plugs in. It relays the stick's requests across the network to the inverter. |
| Solis S2-WL-ST Wi-Fi stick | Works exactly as it would plugged into the inverter, and keeps reporting to SolisCloud. |
| 5 V DC PSU | Powers the Wi-Fi stick. Normally the stick takes its 5 V from the inverter's COM port. |
| 12V DC PSU | Powers the two Waveshare RS485 to ETH (B) modules. |
How the Modbus box is wired. Click for a full-size view (RS485 termination resistors not shown):
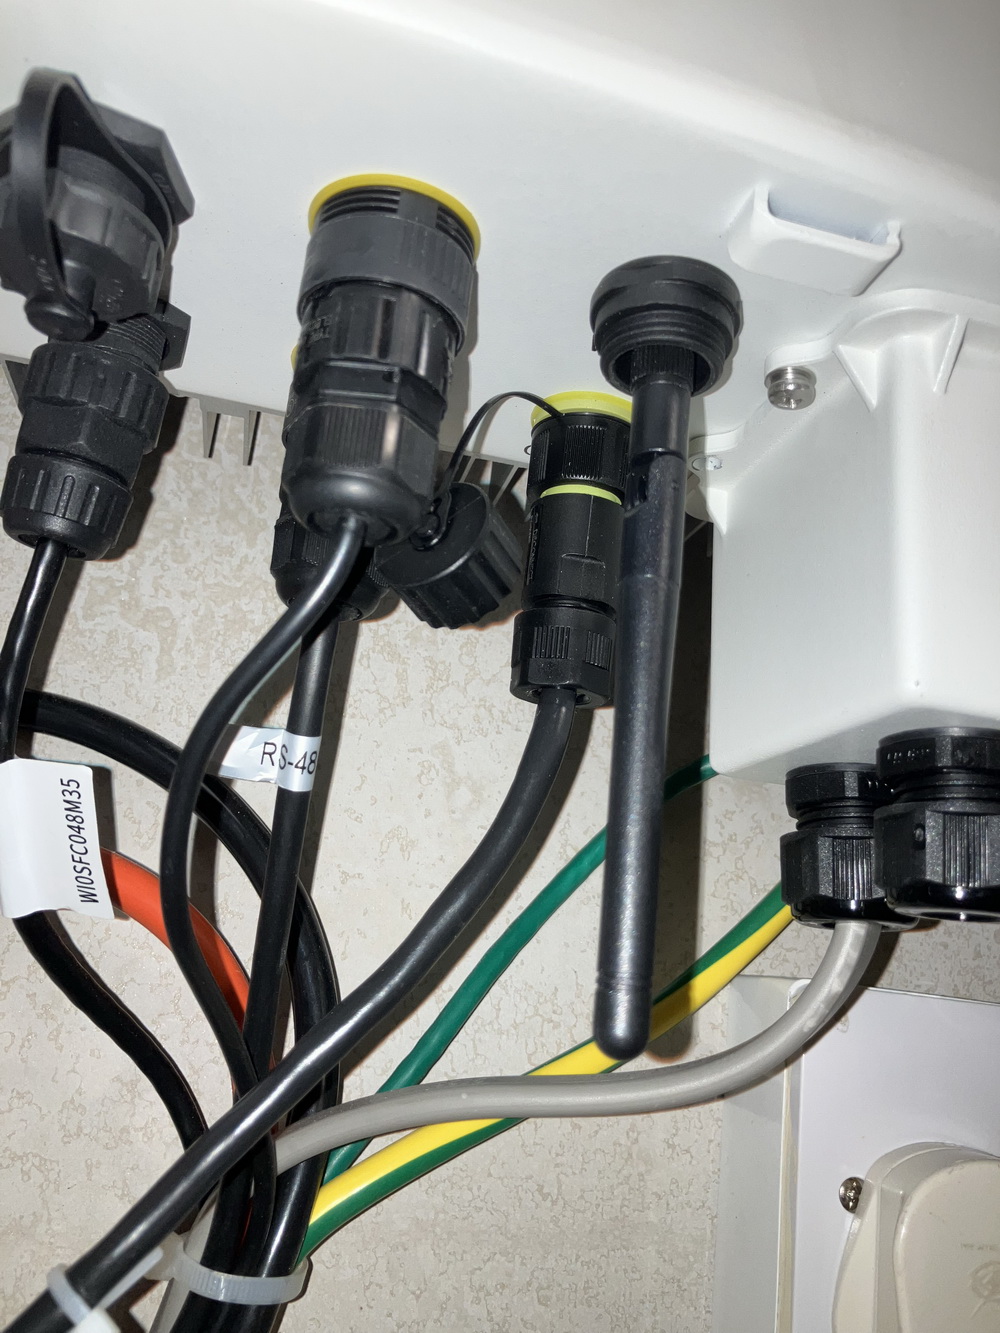
The cables under the inverter. The one labelled RS-485 (green ringed plug) runs from the inverter's COM port to the Modbus box:
The Solis S2-WL-ST Wi-Fi stick:
The Solis COM port
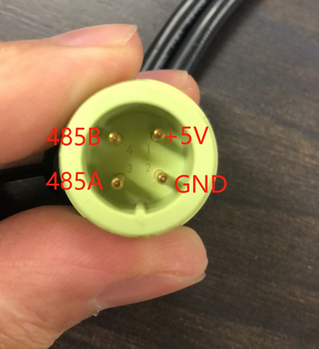
The COM port is the green 4-pin connector found on the bottom of all Solis inverters:
| Pin | Signal |
|---|---|
| 1 | +5 V DC (power for the communication device) |
| 2 | 0 V / GND |
| 3 | RS485 A (+) |
| 4 | RS485 B (−) |
4. How My Config Is Organised
Rather than one huge automations.yaml, I keep one automation per file in a custom_automations folder, and the Modbus devices in their own file. To add an automation, I just drop a new file in the folder and restart Home Assistant.
1automation: !include_dir_list custom_automations2script: !include scripts.yaml3scene: !include scenes.yaml4modbus: !include custom_integrations/modbus.yamlCodequote by Ian Johnston
| Folder | What's in it |
|---|---|
custom_automations |
One automation per YAML file, each with its own id: |
custom_integrations |
YAML includes referenced from configuration.yaml, such as modbus.yaml |
custom_components |
Custom and HACS integrations, including my own wstempcontrol and my modified copy of solis_modbus |
5. Reading the Meter and Sensors over Modbus
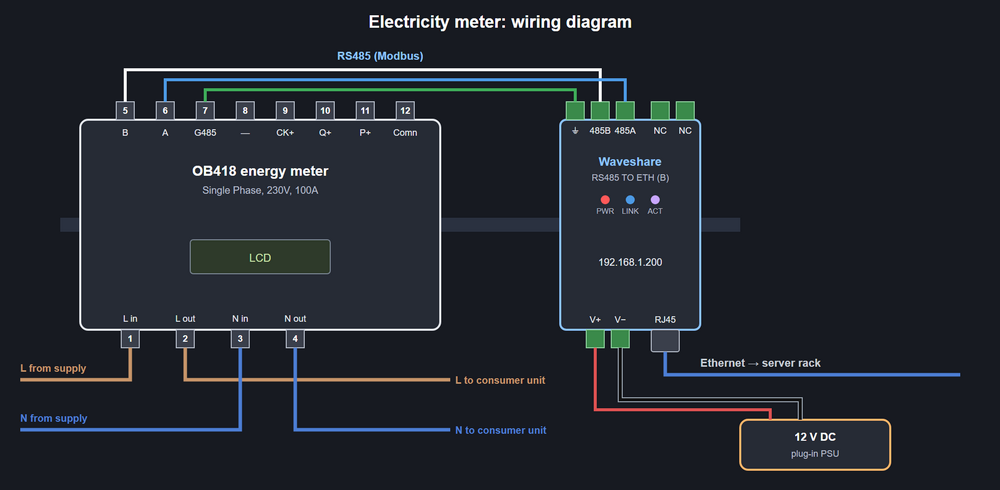
The OB418 meter and the two Battery Room sensors are RS485 Modbus devices too. Each one connects to its own Waveshare RS485-to-Ethernet adaptor, so Home Assistant can read them over the network using Modbus TCP. Here's part of my modbus.yaml:
1- name: "OB418_Energy_Meter"2 type: tcp3 host: 192.168.1.200 # OB418 Smart Meter Waveshare Adapter4 port: 41965 delay: 26 timeout: 57 sensors:8 - name: "OB418 Power"9 slave: 210 address: 0x9211 input_type: input12 data_type: float3213 scale: 1000 # kW to W14 unit_of_measurement: "W"15 precision: 116 17- name: "Battery_Room_Temperature_Sensor_XY-MD02"18 type: tcp19 host: 192.168.1.201 # Waveshare Adapter IP20 port: 4196 # Modbus TCP Port21 delay: 222 timeout: 523 sensors:24 - name: "Battery Room Temperature"25 slave: 226 address: 127 input_type: input28 data_type: int1629 scale: 0.130 precision: 131 unit_of_measurement: "°C"Codequote by Ian Johnston
The OB418 registers I read are all 32-bit floats, as input registers on slave address 2:
| Reading | Register | Notes |
|---|---|---|
| Power | 0x92 |
kW, scaled ×1000 to W. Positive = import, negative = export. |
| Apparent power | 0xD2 |
kVA, scaled ×1000 to VA |
| Power factor | 0x152 |
|
| Voltage | 0x10 |
V |
| Frequency | 0x4E |
Hz |
| Current | 0x52 |
A |
How the OB418 electricity meter is wired to its Waveshare. RS485 termination resistors not shown. Click for a full-size view:
6. Calculating House Consumption
Nothing measures the house consumption directly, so I calculate it: solar + grid + battery. The catch is that the Solis battery power reading is always positive, with a separate sensor giving the direction (0 = charging, 1 = discharging), so the template flips the sign when the battery is charging.
1template:2 - sensor:3 - name: "Total Power Consumption"4 unique_id: total_power_consumption5 unit_of_measurement: "W"6 state_class: measurement7 device_class: power8 state: >9 {% set solar = states('sensor.solar_power') | float(0) %}10 {% set ob418 = states('sensor.ob418_power') | float(0) %}11 {% set battery = states('sensor.solis_s6_solis_battery_power') | float(0) %}12 {# battery_power is always positive; direction 0 = charging, 1 = discharging #}13 {% set battery_direction = states('sensor.solis_s6_solis_battery_current_direction') | int(0) %}14 {% set battery_value = battery if battery_direction == 1 else -battery %}15 {{ (solar + ob418 + battery_value) | round(0) }}Codequote by Ian Johnston
7. Battery Charging from the Solar Forecast
The battery inverter is handled by the Solis Modbus integration, which reads and writes the inverter's registers through the "INV" Waveshare in my Modbus box. I made two changes to my copy of it:
A set_time service
I added a solis_modbus.set_time service, so an automation can write the charge start and end times to the inverter. It uses the same internal logic as changing the time on the dashboard card, so the card updates too.
A battery SOC spike filter
The battery state-of-charge reading occasionally jumped to 0% or 100% for a single read. Now an extreme value is only accepted if it's still there after three consecutive readings. Until then, the last good value is used.
Overnight charging at 00:30
My tariff has a cheap overnight rate. At 00:30 each night, if Enable Overnight Charging is on, an automation reads the Open-Meteo forecast for the coming day and picks a charge window. The sunnier the forecast, the less I charge from the grid:
| Solar forecast (kWh) | Charge start | Charge end |
|---|---|---|
| Below 4 | 02:00 | 05:30 |
| 4 – 6 | 02:00 | 05:00 |
| 6 – 8 | 02:00 | 04:30 |
| 8 – 10 | 02:00 | 04:00 |
| 10 – 12 | 02:00 | 03:30 |
| 12 – 14 | 02:00 | 03:00 |
| 14 or more | No charge (00:00 – 00:00) | |
It stores the forecast it used (shown in brackets on the dashboard), logs the decision, posts a notification, then writes the times to the inverter. Here's the start and end of that automation, with one forecast band shown:
1alias: Set Overnight Charging Schedule2description: Determines overnight charging time based on solar forecast3mode: single4trigger:5- platform: time6 at: 00:30:007condition:8- condition: state9 entity_id: input_boolean.overnight_charging_enabled10 state: 'on'11action:12- choose:13 - conditions:14 - condition: numeric_state15 entity_id: sensor.energy_production_today_216 below: 617 sequence:18 - service: input_datetime.set_datetime19 target:20 entity_id: input_datetime.charge_start21 data:22 time: 02:0023 - service: input_datetime.set_datetime24 target:25 entity_id: input_datetime.charge_end26 data:27 time: 05:0028 # ... one block per forecast band ...29- service: solis_modbus.set_time30 data:31 entity_id: time.solis_s6_solis_time_charging_charge_start_slot_132 time: '{{ states(''input_datetime.charge_start'') }}'33- delay: 00:00:0234- service: solis_modbus.set_time35 data:36 entity_id: time.solis_s6_solis_time_charging_charge_end_slot_137 time: '{{ states(''input_datetime.charge_end'') }}'38id: set-overnight-charging-scheduleCodequote by Ian Johnston
Afternoon top-up
A second automation runs at 14:55. If Enable 3–4pm Top-up Charging is on and the battery is below 40%, it sets the charge window to 15:00–16:00, so the battery has some charge going into the evening. The 00:30 automation then sets the overnight window again as normal.
8. Workshop Aircon Control
The Daikin's own internal thermostat measures the temperature at the indoor unit, which is problematic as it it's own control mechanism generates too much temperature hysterisis in the workshop. So I wrote a small custom integration, wstempcontrol, that controls the aircon independently from my own workshop temperature sensor and Home Assistant.
It adds an on/off switch (Workshop Temperature Control) and three setpoints (Cool, Fan and Heat), adjustable from 18 to 26 °C on the dashboard. Every time the temperature changes, it decides what the aircon should be doing, using a hysteresis of 0.1 °C
The end result is the Workshop temperature is controlled to within +/- 0.2degC:
| Workshop temperature | Aircon |
|---|---|
| Above the Cool setpoint | Turns on Cool mode |
| Between the Fan and Cool setpoints | Turns on Fan only mode |
| Between the Heat and Fan setpoints | Off |
| Below the Heat setpoint | Turns on Heat mode |
Setting the Cool or Heat setpoint to its minimum of 18 °C disables that mode, which is what the "(>18)" on the dashboard means. With cooling disabled, the Fan setpoint takes over as the upper limit.
The integration sends its commands straight to the Daikin's local Wi-Fi API with a rest_command, along with the fan rate and fan direction chosen on the dashboard:
1rest_command:2 daikin_control:3 url: >-4 http://192.168.1.203/aircon/set_control_info?pow={{ pow }}&mode={{ mode }}&stemp={{ stemp }}&shum=0&f_rate={{ f_rate }}&f_dir={{ f_dir }}Codequote by Ian Johnston
The Daikin mode codes are 3 for cool, 4 for heat and 6 for fan. There's also a small safety-net automation: when I switch Workshop Temperature Control off, it turns the Daikin off too, trying up to three times, 30 seconds apart, in case the aircon's Wi-Fi misses a command.
The workshop temperature itself comes from a cheap USB temperature/humidity sensor plugged into the Home Assistant box. My small custom dogratian component reads it over the serial port, and an automation forces a fresh reading every 10 seconds.
9. Battery Room Safety Alarms
The batteries live in the Battery Room, so I monitor its temperature and smoke level. Each has a HiHi setpoint slider on the dashboard (default 40 °C and 90 ppm). If either reading stays above its setpoint for one minute, Home Assistant emails me. Both alarms also check when Home Assistant starts, so an alarm that's already active isn't missed after a restart.
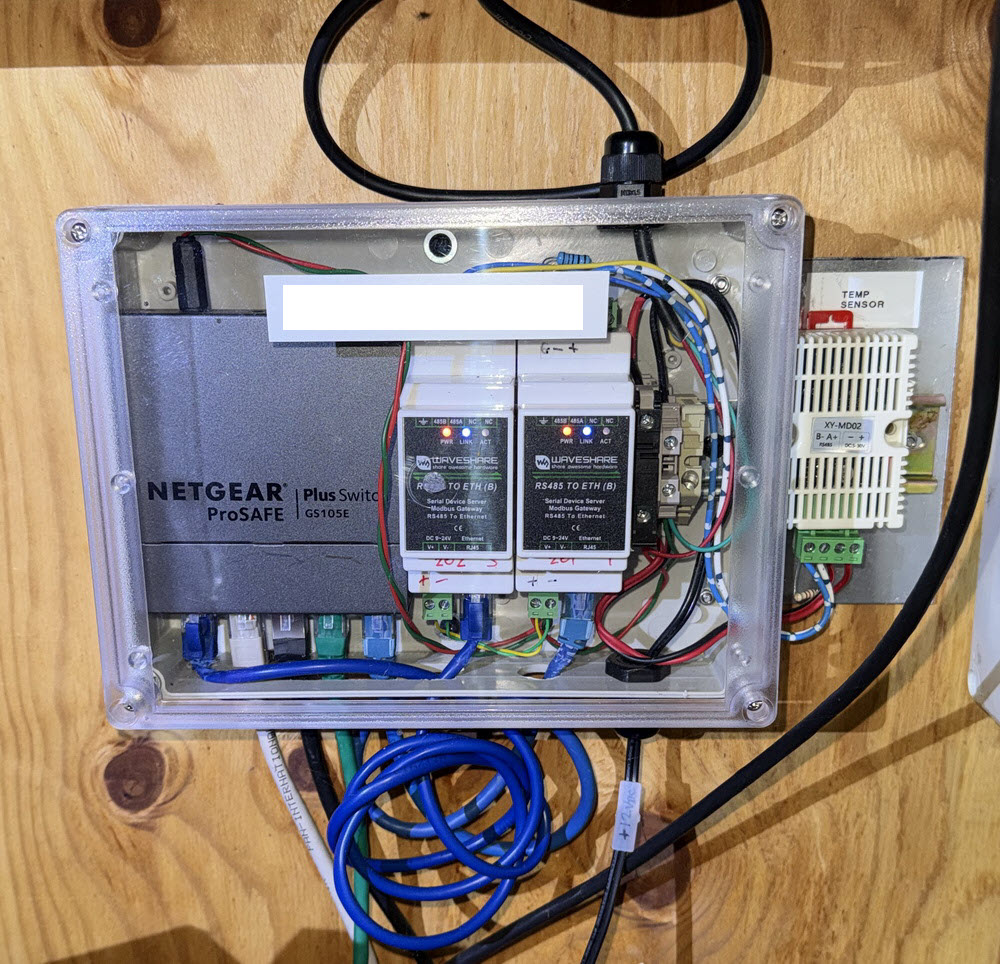
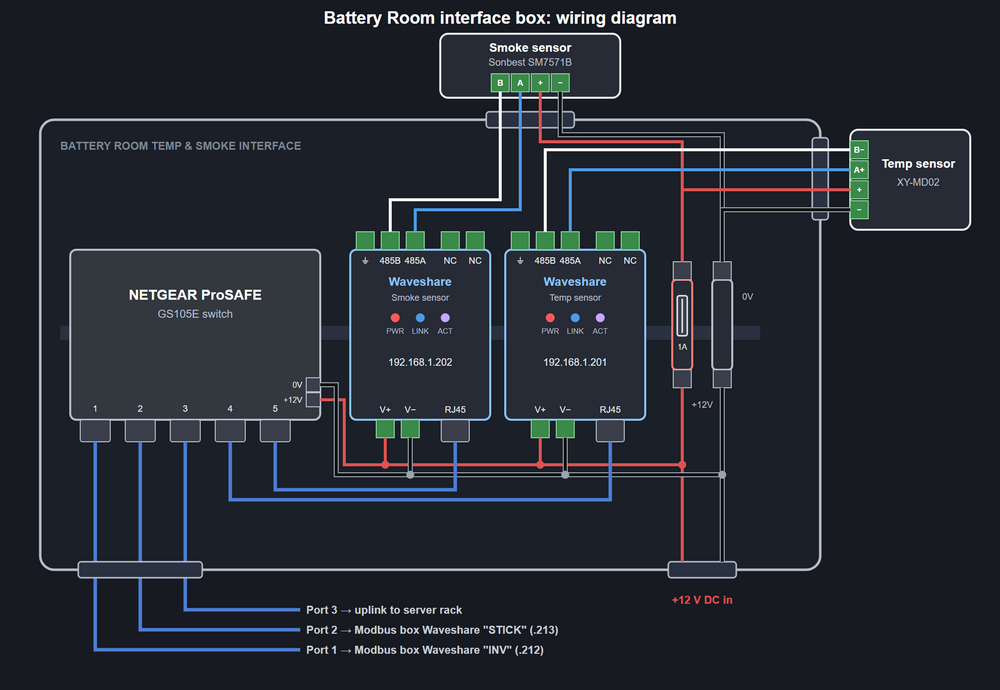
The "Battery Room Temp & Smoke Interface" box: a Netgear ProSAFE GS105E switch and two Waveshare RS485-to-Ethernet adaptors, with the XY-MD02 temperature sensor mounted alongside:
How the Battery Room interface box is wired. RS485 termination resistors not shown. Click for a full-size view:
1alias: "Battery Room Temperature High Alarm"2id: battery-room-temperature-high-alarm3description: Email when Battery Room temperature stays above the HiHi setpoint for 1 minute4mode: single5triggers:6 # Fires when the temperature crosses above the setpoint (setpoint read live from the slider)7 - trigger: numeric_state8 entity_id: sensor.battery_room_temperature9 above: input_number.battery_room_temp_hihi10 for:11 minutes: 112 # Catch an alarm condition that already exists when HA starts13 - trigger: homeassistant14 event: start15conditions:16 - condition: numeric_state17 entity_id: sensor.battery_room_temperature18 above: input_number.battery_room_temp_hihi19actions:20 - action: notify.email_alerts21 data:22 title: "Battery Room Temperature Alarm!"23 message: "Battery Room temperature is HIGH: {{ states('sensor.battery_room_temperature') }}°C! Setpoint: {{ states('input_number.battery_room_temp_hihi') }}°C"Codequote by Ian Johnston
The emails go out through Home Assistant's SMTP notify platform, with the mail password kept in secrets.yaml.
10. Uploading to PVOutput
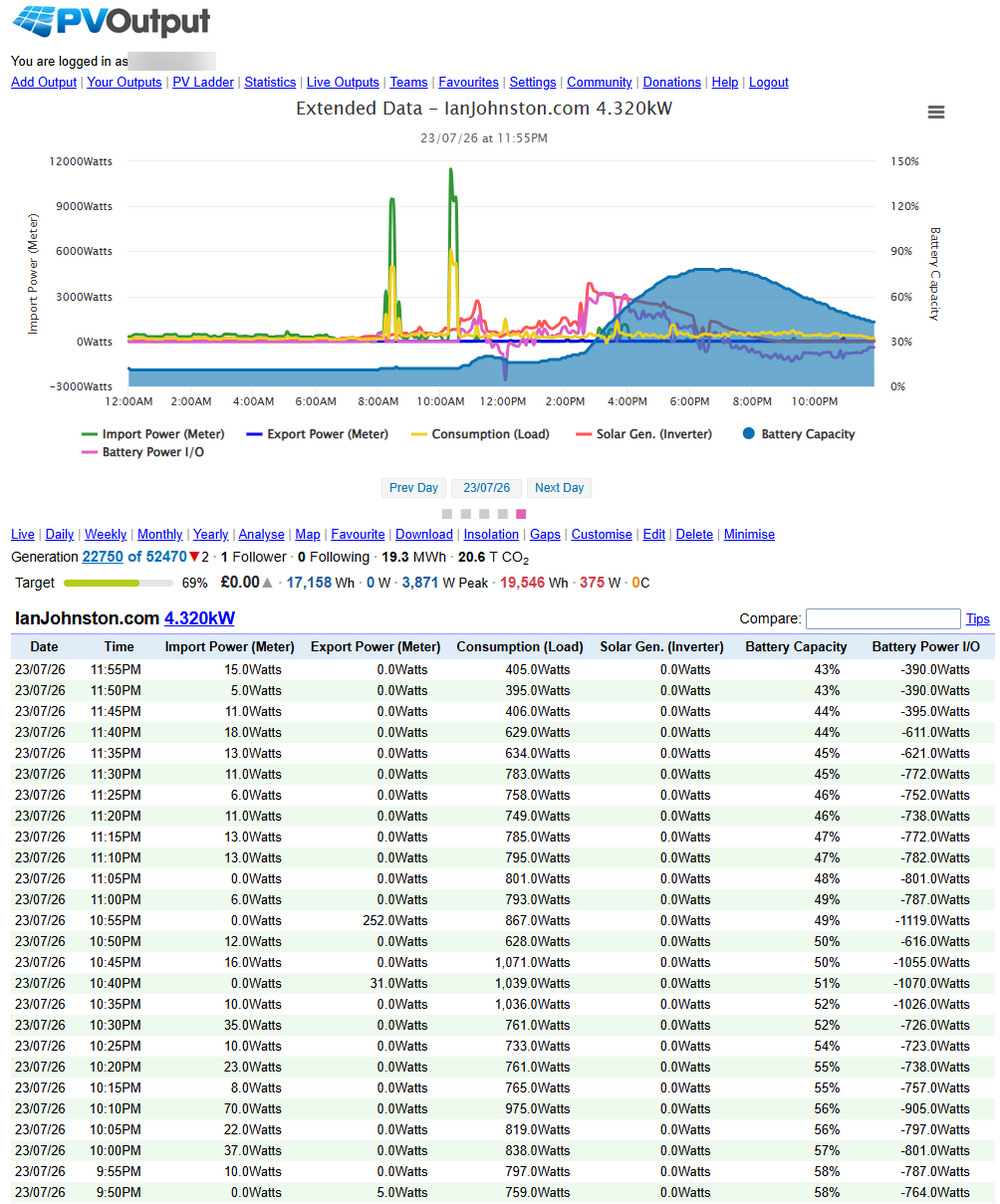
Every 5 minutes, an automation calls a rest_command that posts my solar generation, consumption, grid voltage, import/export, battery state of charge and battery power to PVOutput, using its extended data fields. PVOutput then plots it all on one chart, with a 5-minute table underneath:
| PVOutput field | What I send |
|---|---|
| Import / Export Power (Meter) | Grid import and export from the OB418 meter |
| Consumption (Load) | The calculated house consumption |
| Solar Gen. (Inverter) | Solar power from the Bosch inverter |
| Battery Capacity | Battery state of charge from the Solis inverter |
| Battery Power I/O | Battery charge (+) or discharge (−) power |
My PVOutput extended data for one day. Click for a full-size view:
PVOutput needs an API key and system ID in the request headers. Put them in
secrets.yaml and reference them with !secret, e.g. X-Pvoutput-Apikey: !secret pvoutput_api_key, so they never end up in a backup, a screenshot or a forum post.11. The Dashboard
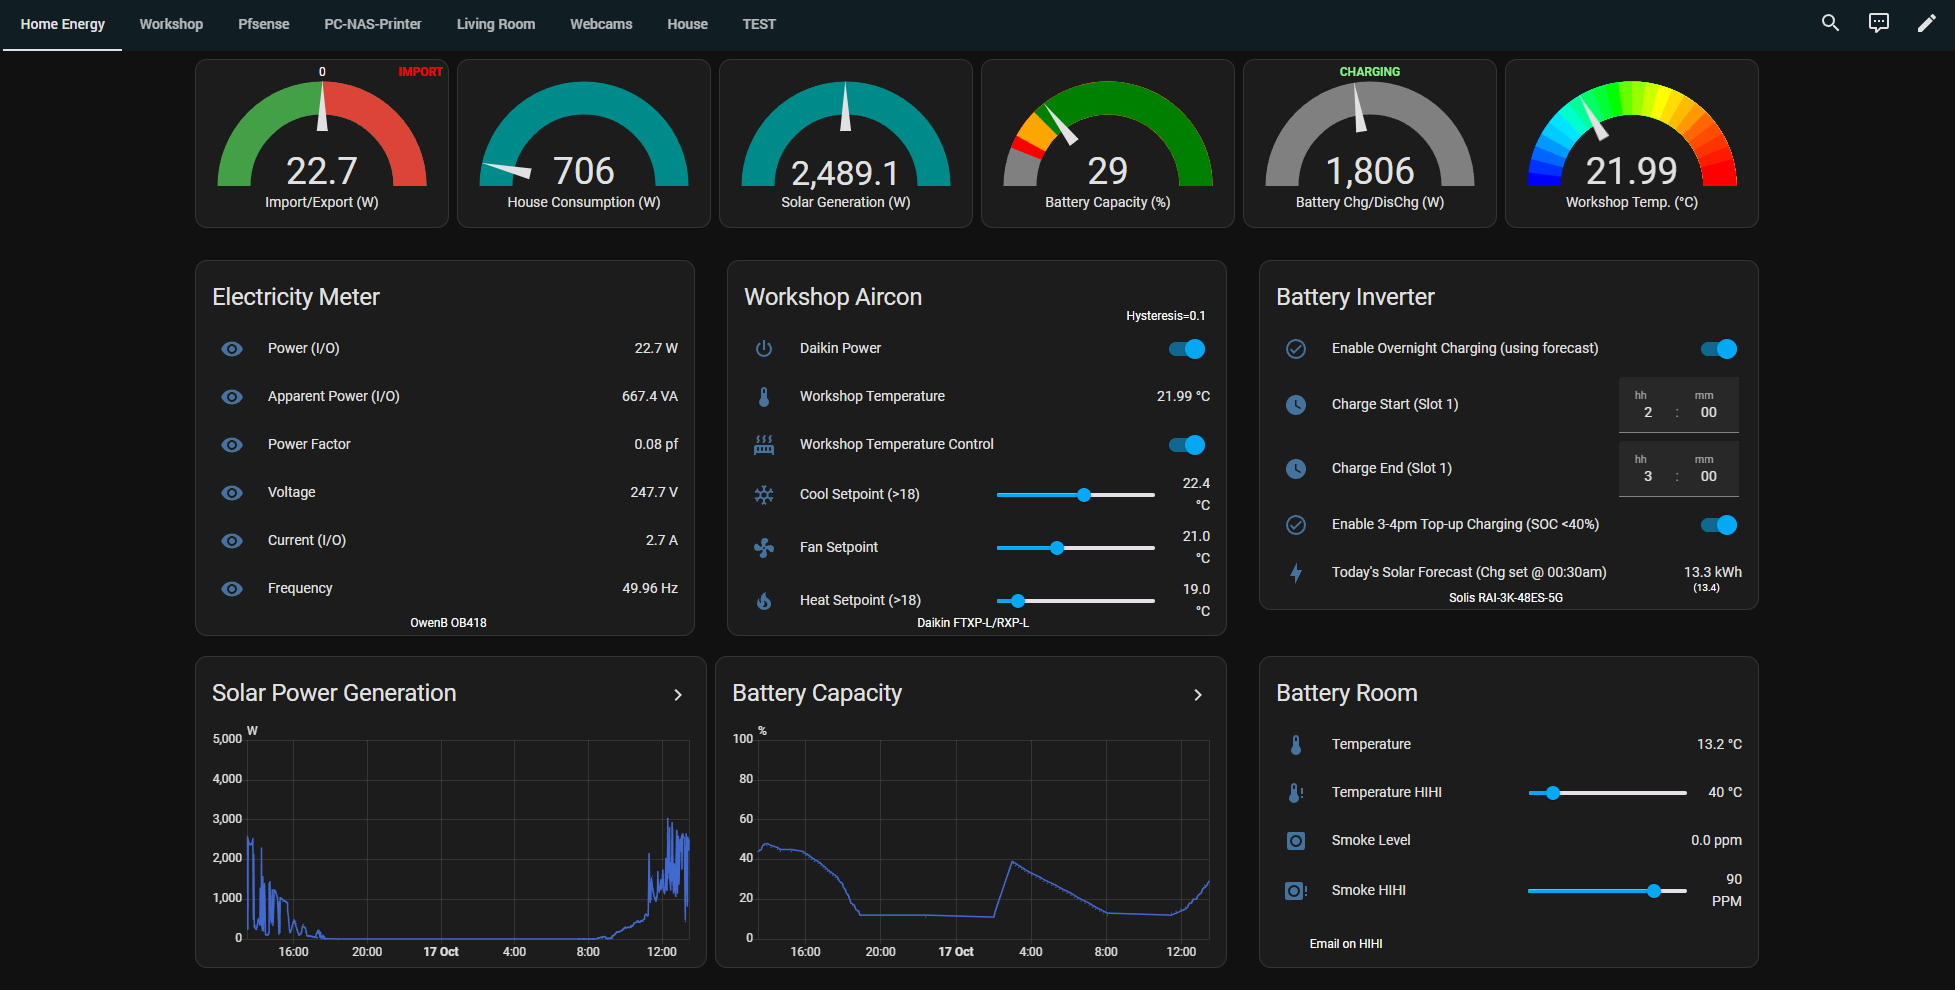
The Home Energy tab is a standard Sections dashboard, as shown at the top of this article. Click the image for a full-size view.
| Card | What it shows |
|---|---|
| Gauges (top row) | Import/export, house consumption, solar generation, battery capacity, battery charge/discharge and workshop temperature |
| Electricity Meter | All six OB418 readings |
| Workshop Aircon | Daikin power, the workshop temperature, the control switch and the three setpoint sliders |
| Battery Inverter | The overnight and top-up charging switches, the charge start/end times and today's solar forecast |
| History graphs | Solar power and battery capacity over the last day |
| Battery Room | Battery Room temperature and smoke level, with the HiHi alarm sliders |
The small status labels on the gauges, such as IMPORT/EXPORT and CHARGING/DISCHARGING/STANDBY, are added with card-mod, which lets a card's CSS use templates. This is the Import/Export label:
1card_mod:2 style: |3 ha-card {4 position: relative;5 }6 ha-card::after {7 {% set power_state = states('sensor.ob418_power') %}8 {% if power_state in ['unknown', 'unavailable'] or power_state is none %}9 content: "N/A";10 color: gray;11 {% else %}12 {% set power = power_state | float(default=0) %}13 {% if power < 0 %}14 content: "EXPORT";15 color: lightgreen;16 {% elif power > 0 %}17 content: "IMPORT";18 color: red;19 {% else %}20 content: " ";21 color: gray;22 {% endif %}23 {% endif %}24 position: absolute;25 top: 8%;26 right: 2%;27 transform: translate(0, -50%);28 font-size: 12px;29 font-weight: bold;30 text-align: right;31 }Codequote by Ian Johnston
The extra HACS front-end cards I have installed are:
- card-mod
- mini-graph-card
- vertical-stack-in-card and stack-in-card
- flex-table-card
- multiple-entity-row
12. The Other Dashboard Tabs
Home Energy is just the first tab. The others bring in the rest of the house and workshop:
Workshop lighting
Controls for the WLED lighting in the workshop.
pfSense
Data from my pfSense firewall, including internet download and upload speed graphs.
Workshop printer
Drum and toner cartridge status for the HP LaserJet 100 in the workshop.
House webcams
Live views from the cameras around the house.
13. Final Thoughts
Moving from my own VB.NET app to Home Assistant was well worth it. Talking to the inverter, meter and sensors directly over Modbus is faster and far more reliable than going through the cloud, and the whole system keeps working if the internet goes down. Thanks to the Modbus box, I didn't have to give up SolisCloud to get there.
Home Assistant also made it easy to bring everything else into one place: the workshop aircon, the Battery Room alarms, the cameras and the rest. Where an integration didn't do quite what I wanted, it was straightforward to write a small custom one, or to modify an existing one, as I did with Solis Modbus.
If you have a Solis inverter and you're still relying on the cloud, the Solis Modbus integration is a great place to start.
